170 Commonwealth Avenue, Suite 101 Boston, MA 02116
Phone: (617) 726-5280
Enlarging the Deficient Mandible by: Michael J. Yaremchuk, M.D.
Introduction
Patients with small lower jaws may derive aesthetic benefit from alloplastic augmentation of both their anterior and posterior mandible. Augmentation of the contours of their mandible balances†their facial dimensions while adding definition and angularity to the lower third of their face. Most patients with small mandibles have a normal occlusion. Significant mandibular deficiency may result in Class II dental malocclusion. The majority of these patients can have their dental relationships normalized through orthodontic tooth movement. Those with severe mandibular deficiency require surgical advancement of the mandible to correct the malocclusion. The classic method of correcting Class II dental malocclusion in patients with significant mandibular deficiency, in addition to preoperative and postoperative orthodontic treatment, includes sagittal split ramus osteotomy and sliding advancement genioplasty, with possible LeFort I maxillary impaction. This combination of procedures can provide a Class I dental relationship while normalizing the skeletal contour. In patients with mandibular deficiency who have had their malocclusion corrected through orthodontics alone, mandibular osteotomy would disturb these dental relationships, requiring extensive perioperative orthodontic treatment. This type of treatment is both costly and time consuming. Alloplastic augmentation of the mandible can provide a visual effect similar to, and, in my opinion, superior to that of sagittal osteotomy with advancement (ref 1). This article presents my operative strategies for improving the skeletal contours of the deficient mandible with normal occlusion. The anatomy associated with a deficient mandible, that be can camouflaged with implants, includes the obtuse mandible angle with steep mentocervical angle, the decreased vertical and transverse ramus dimensions as well as the poorly projecting chin. When the chin is deficient in both the vertical and sagittal dimensions, it is lengthened vertically by horizontal osteotomy and augmented sagitally with an implant. When the poorly projecting chin is long in the vertical direction, it is shortened, and then augmented sagitally with an implant. In addition to normalizing dimensions of the deficient mandible, modest augmentation of lower jaws with normal dimensions can help balance upper and lower facial relations as well as increase angularity.
EVALUATION AND PLANNING
Physical Examination
Physical examination is the most important element in preoperative assessment and planning. Reviewing life-size frontal and lateral photographs with the patient can be helpful when discussing aesthetic concerns and goals. To allow the patient to understand the scale and scope of augmentation, it is useful to have sample implants available to both demonstrate on a model skull and to apply these implants to the relevant area of the patient’s face. All faces are asymmetric. Asymmetries are usually subtle but, with sufficient scrutiny, detectable. Their recognition preoperatively is important to both the surgeon and the patient. The patient’s asymmetry should be pointed out during the preoperative consultation so that the patient can anticipate asymmetry in the post operative result.
X-rays
Most procedures are done without preoperative radiology assessment. In general, the size and position of the implant are largely aesthetic judgments. Posteroanterior and lateral cephalograms provide data that help the surgeon determine how the dimension of the implant might be altered to best suit the patient. Three dimensional computerized tomographic scans and the models obtained from their data can be invaluable when attempting to correct asymmetries associated with congenital, post-traumatic, or post surgical deformities. In general, however, the size and position of the implant are largely aesthetic judgments.
Facial Measurements
Because implant augmentation of the facial skeleton, results in measurable changes in facial dimensions and proportions, it is intuitively attractive and appropriate to use facial measurements to evaluate the face and to guide surgery. Although usually referenced in texts discussing facial skeletal augmentation, neoclassical canons have a limited role in surgical evaluation and planning because they are based on idealizations. When the dimensions of normal males and females were evaluated objectively and compared to artistic ideals, it was found that some theoretic proportions are one of many variations found in healthy normal individuals, or those determined more attractive than normal individuals, and some are never found (refs 2, 3). I prefer to use the anthropometric data of Farkas (ref 4) in patient evaluation and surgical planning. Anthropometric data aids facial evaluation and surgical planning by describing normal facial measurements and relations. With this framework, the status of the patient is more easily understood and the goals of surgery defined. The dimensions and complex configuration of the face make millimeter differences and changes noticeable and significant. Implants that are too large create unnatural contours that relate poorly to other areas of the face. Inappropriate implants may, therefore, upset the balance†of the face. Facial implants must be appropriately sized, shaped, and positioned to be effective. Implants The majority of alloplastic facial skeleton augmentation is done with implants made of silicone rubber or porous polyethylene. I prefer porous polyethylene implants (Medpor), ( Matrix Surgical, Atlanta, GA), to augment the facial skeleton. Porous polyethylene is firm, and flexible. It is easily carved with a scalpel or contoured with a rasp or motorized burr. It can be immobilized with sutures, or, with my preference, screws. Porous polyethylene has pores of sufficient size to allow fibrous tissue ingrowth and relative host incorporation, as opposed to the host encapsulation observed with smooth surfaced implants. Rather than the dense connective tissues capsules observed with smooth-surfaced implants, porous polyethylene implants exhibit a thin connective tissue membrane that is contiguous with the ingrown tissue (ref 5) The use of porous implants has been criticized because, unlike smooth implants, they require wider exposure for positioning and are more difficult to remove. Personal preference and the “learning curve†have made both of these problems less significant for me. Wider exposure has been demonstrated to result in more accurate implant positioning. Because the initial augmentation has been considered accurate for the majority of patients, revisional surgical procedures are less frequent. When porous polyethylene implants require removal, dissection directly on the implant minimizes adjacent soft-tissue trauma.
The manufacturer provides multiple implant shapes and sizes intended for specific anatomical areas. It is unusual or me to use an implant without changing its contour (reducing it) to meet the needs of the specific situation.
Ramus and body implants (Figure 1)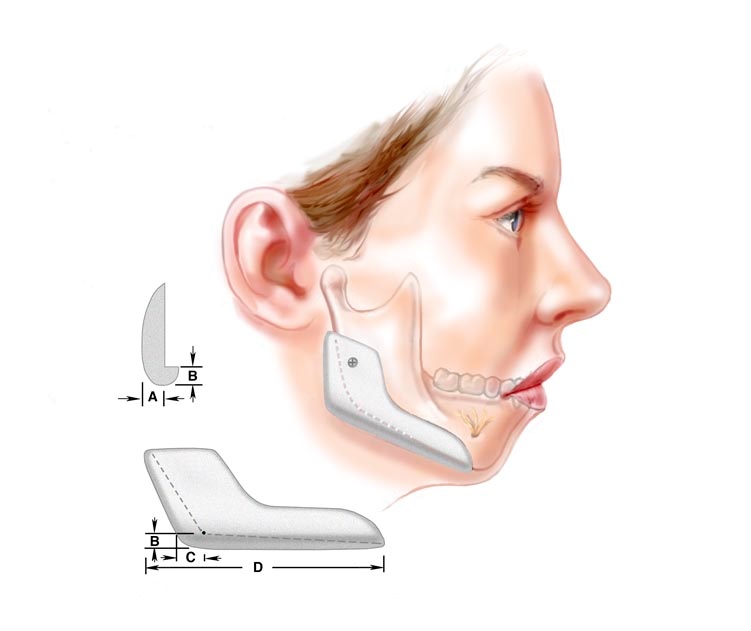
Implant designs and concepts are developed from the work of Terino (refs 5,6) Whitaker (ref 7), Aiche (ref 8), Taylor and Teenier (ref 9), Ramirez (ref 10), as well as this author (ref 11). I use ramus and body implants designed to change the shape of the mandible in three dimensions: bigonial width, ramus height, and body length, as well as, the inclination of the mandibular border (figure 1). The increase in bigonial distance (or posterior width) is determined by the thickness of the implant (dimension A). Increases in ramus height and body length result from flanges designed at the inferior (dimension B) and posterior borders (dimension C) of the implant, respectively. The length of the implant (dimension D) will determine how much of the anterior mandibular bodIy will be impacted by the implant. Its tapering projection beyond the inferior edge of the mandible (B) allows it to change the inclination of the plane of the mandibular border. Because it also projects beyond the posterior border, in addition to extending beyond its inferior edge of the ramus, it can lessen the obliquity of the mandibular angle. The implant is used with a chin implant for deficient mandibles.
Chin Implants (Figure 2)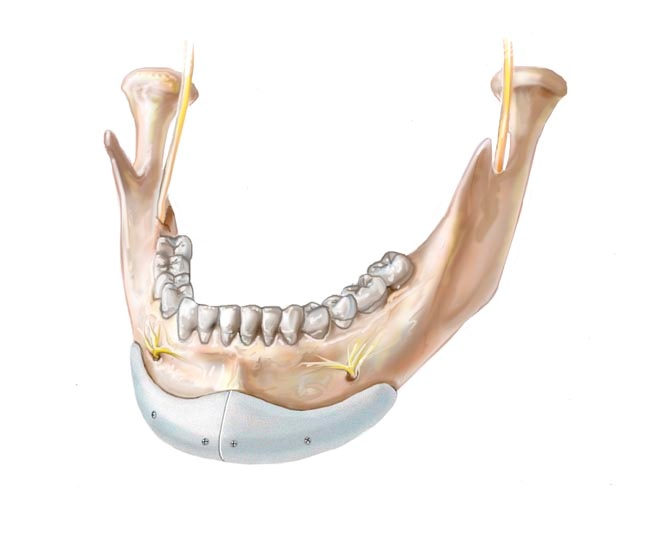
I use an implant design which is extended and whose external shape resembles that of the native mandible (ref 11). It resembles the popular “extended†silicone chin implant design but differs in two important aspects. The chin implant comes in two pieces; a right half and a left half. Segmentation facilitates placement of the relatively long and stiff, porous implant. The two-piece design also provides flexibility in positioning the lateral extensions of the implants, ensuring that it mimics the inclination of the patient’s mandibular border. (Figure 2) The manufacturer provides a tab insert which is designed to lock the right and left halves of the chin implant. I rarely use this connecting tab because it dictates the position of the lateral limbs of the implant as well as the width of the central portion of the implant. It effectively makes it a one piece implant.
OPERATIVE TECHNIQUE
Anesthesia
It is my preference to perform mandible augmentation under general anesthesia. This provides a panoramic view of the operative field. The airway is protected while the oral cavity can be optimally prepared. The face and oral cavity are prepared with an iodine solution after placement of a throat pack. The operative site is infiltrated with 1/200,000 epinephrine solution to aid in hemostasis.
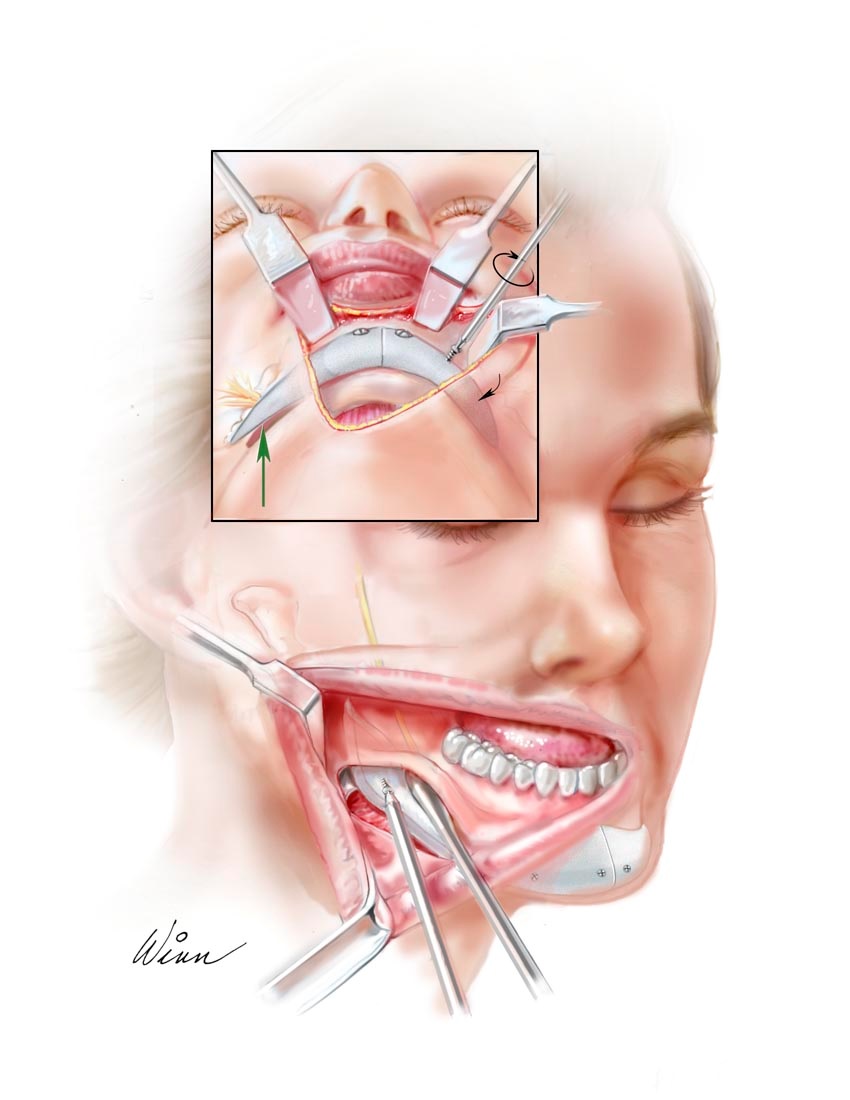
Incisions and exposure (Figure 3)

A generous intraoral mucosal incision is made to expose the ramus and body of the mandible. It is made at least 1 centimeter above the sulcus on its labial side. Unlike an incision made directly in the sulcus, this incision provides ample tissue on both its lingual and labial margins for suture closure. Also, unlike the sulcus incision, there is no tendency for saliva to pool over the suture line with a potential to percolate through the incision and to contaminate the implant. A submental incision is made for access and exposure of the anterior mandible and chin. I avoid an intraoral approach to the chin area. This approach often damages the mentalis muscle sufficiently to result in chin ptosis and lip incompetence. The entire anterior surface of the mandibleis exposed in a subperiosteal plane. It is important to free both the inferior and posterior borders of the mandible of soft-tissue attachments to allow implant placement. The mental nerve is always visualized as it exits its foramen.
Adjusting the vertical height of the chin (Figures 4 and 5)
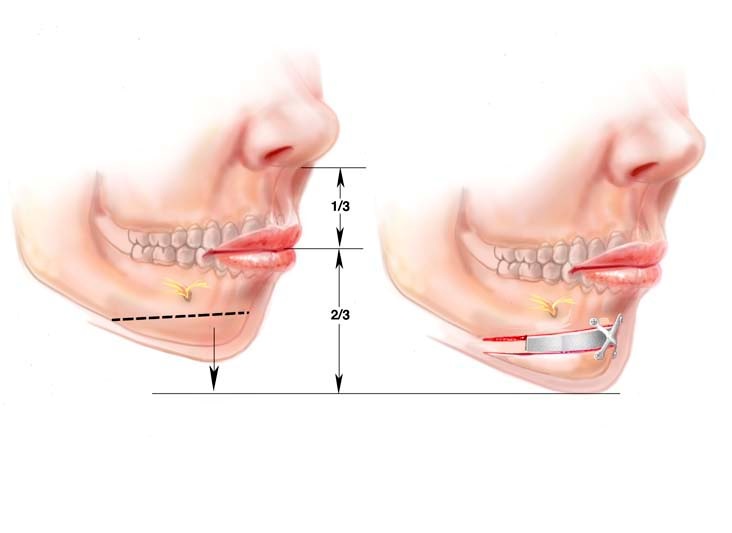
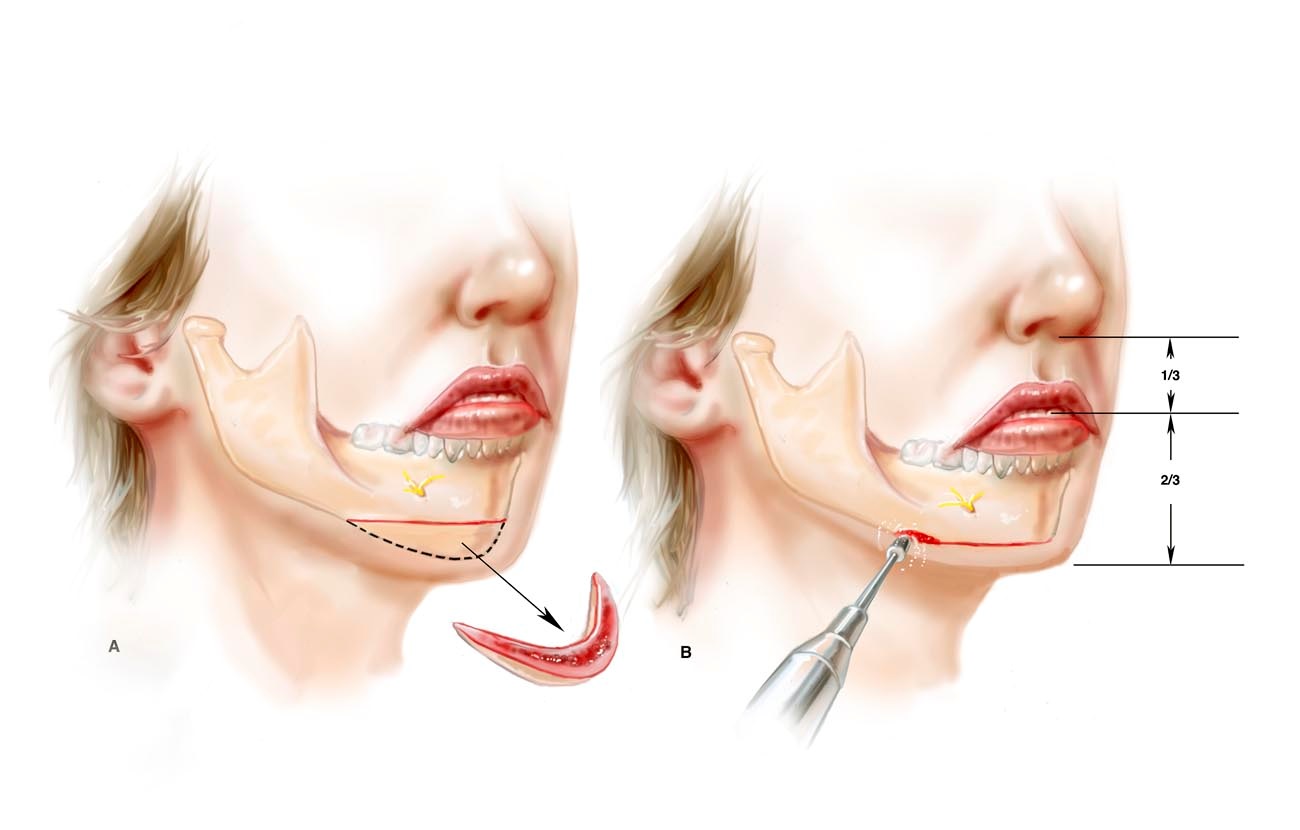
Patients with deficient mandibles often need the vertical height of their chin adjusted before implant augmentation of their jaw is performed. Those with inadequate vertical height undergo a vertical lengthening by performing a horizontal osteotomy of the chin through the submental incision. It is lengthened a predetermined amount so that the distance from the base of the nose to the mouth opening is half the distance from base of the nose to end of the chin. (This is the average relationship in young North American Caucasians. (ref 4).) The position of the lowered (but not advanced!) segment is fixed with titanium plates and screws. The space created by the bone movement is filled with a block of porous polyethylene. This block adds stability to the construct and fills dead space (Figure 4). Patients with mandibular deficiency and a long face often have an increase in vertical chin height, in part, due to the derotation of the mandible caused by the long midface. The chin is shortened at its inferior border up to 5 mm in these patients. Later augmentation of the new chin point will support the relative excess of soft tissue created by the vertical reduction (Figure 4b).
Implant positioning, fixation and final contouring (Figure 6 )
To ensure the desired placement of the implants and their application to the surface of the mandible, the implants are fixed to the mandible with titanium screws.
Ramus and Body (Figure 6a and 7)
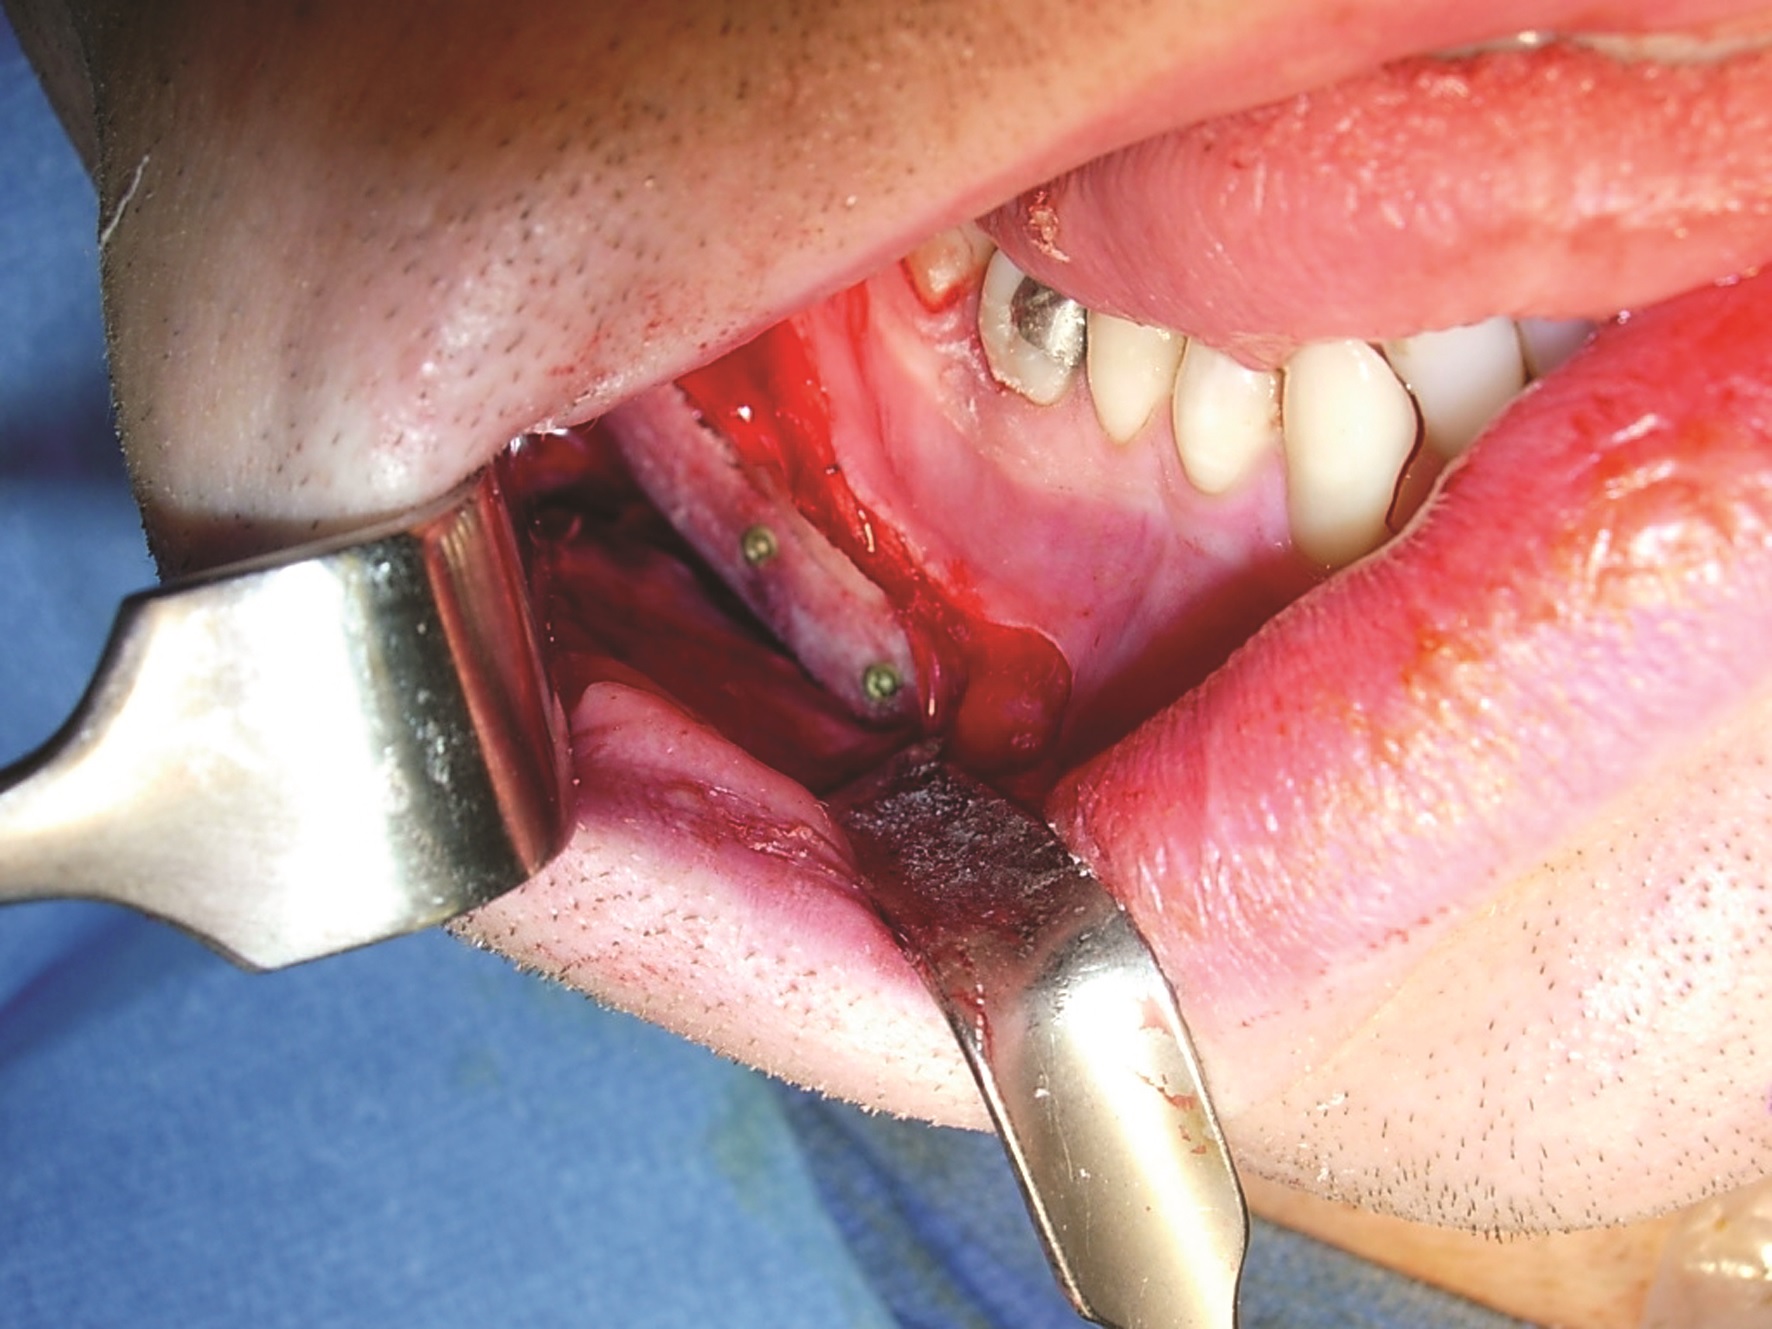
Because the intraoral incision is remote from the posterior two thirds of this large implant, positioning and screw fixation of the ramus and body implants requires vigorous retraction of the soft tissues. The implant is positioned so that the flange at its inferior border (dimension B – figure 1), which will alter ramus height and border inclination, abuts on the inferior edge of the mandible border. In the cases where the chin has been lengthened by horizontal osteotomy, the most anterior aspect of the mandible implant (dimension D) will extend to the lateral edge of the lowered chin segment. This implant positioning camouflages the inevitable step-off that occurs after horizontal osteotomy and movement of the chin. A long, guarded drill bit is necessary to make the drill holes for screw fixation because the limited surgical exposure requires that the drill holes to be made obliquely through the implant and then the skeleton. Screws must be 10 to 12 mm in length to obliquely traverse the implant and then the mandible. By applying the implant to the skeleton, screw fixation eliminates any gaps between the implant and the recipient bed. Gaps are potential sites for hematoma or seroma accumulation. More importantly, gaps also result in an effective increase in augmentation. For example, a 2 millimeter gap between the posterior surface of a 5 millimeter implant would produce an augmentation equivalent to a 7 millimeter implant whose posterior surface was applied directly to the anterior surface of the skeleton. Usually two screws are used to obliterate any gaps between the mandible and the implant. Screws are placed to avoid the anticipated path of the inferior alveolar nerve before its exit from the mental foramen. It is crucial to soften any transitions between the implant and the mandible, particularly where the implant extends beyond the anterior mandibular border’s inferior edge. Any step-offs between the implant and the mandible in this area may be visible in thin patients. Screw fixation of the implants allows scalpel or mechanical burr final contouring with the implants in place.
Chin (Figures 6b, 8, and 9)
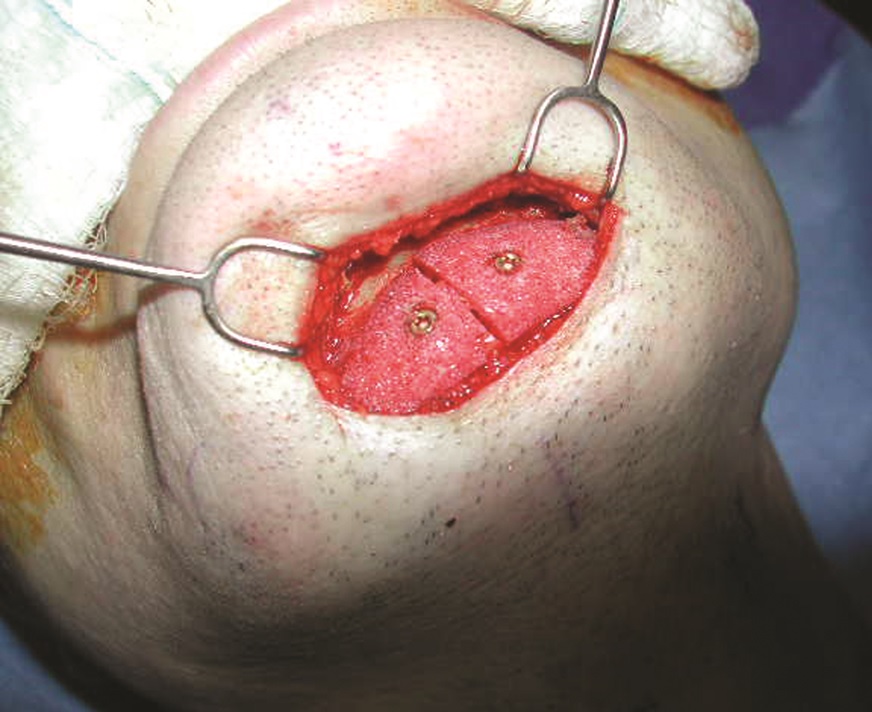
The chin and lower anterior mandible are accessed through the submental incision. The midline of the chin is scored with the drill on the pogonion as a reference point. Each half of the two-piece chin implant is positioned so that it extends from the midline up to, or before, but rarely overlaps, the anteriormost aspect of the ramus and body implant (which has already been positioned). The inferior border of the chin implant parallels and augments the inferior border of the native mandible while creating a smooth transition with the inferior border of the ramus and body implant. Various configurations of implants and manipulations of chin height are depicted in the clinical examples.
Wound closure, dressings, and postoperative care
The intraoral incision are closed in two layers with absorbable sutures. Care is taken to evert the mucosal edges. A small suction drain is left in until the next morning. I prefer one with a trocar which allows the skin exit site to be located behind the ear lobule. An elastic tape external dressing is used to help apply the soft tissues to the implant and avoid hematoma formation. Patients are administered broad spectrum antibiotics (Cephalosporins) intravenously immediately before the procedure. Oral antibiotics are administered for five days postoperatively. Neither the operative field nor the implants have been treated with antibiotic solutions. A liquid diet is prescribed for the first three days postoperatively and a soft diet for the next five days. Frequent mouth washes are advised as well as careful tooth brushing.
Clinical examples (Figures 10, 11 and 12)
Figure 10 shows a patient with a microgenia and a deficient mandible who underwent horizontal osteotomy and 8 mm vertical elongation of the chin (with manipulations similar to those shown in figure 4), 3mm sagittal implant augmentation of the chin, 5mm implant widening and 3mm lengthening of the ramus.
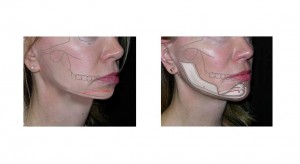
Figure 11 shows a patient with a long face and deficient mandible who underwent shortening of the chin by 4mm, sagittal augmentation of the chin with an implant by 9mm, augmentation of the width of the mandible by 5mm , and increase of the ramus height by 5mm. A submental lipectomy was also performed. The skeletal and implant manipulations are similar to those shown in figure 5)
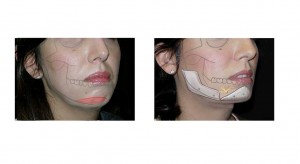
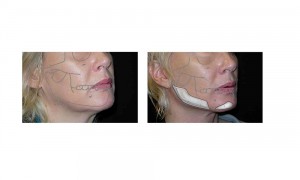
Figure 12 shows a woman whose mandibular dimensions were within normal range, but who desired more angularity and definition to her lower face. She underwent 3mm sagittal implant augmentation of her chin, 4mm implant augmentation of the width of her mandible, as well as rhytidectomy.
CONCLUSION
Patients with deficient mandibles and normal occlusion can have the dimensions of their lower face normalized by alloplastic implant augmentation. Successful outcomes depend on knowledge of normal facial skeletal relationships, appropriately designed, biocompatible implants, and facility with craniofacial techniques.
References
1. Yaremchuk, MJ. Atlas of Facial Implants, Philadelphia: Saunders-Elsevier, 2007.
2. Farkas L, Hreczko TA, Kolar JC, Munro IR. Vertical and horizontal proportions of the face in young adult North American Caucasians: revision of neoclassical canons. Plast. Reconstr. Surg. 75:328, 1985.
3. Farkas LG, Kolar JC. Anthropometrics and art in the aesthetics of women’s faces. Clin. Plast. Surg. 14:599, 1987.
4. Farkas LG, Hreczko TA, and Katic MJ. Appendix A: Craniofacial norms in North American Caucasians from Birth (One Year) to young adulthood. In L.G. Farkas (Ed.), Anthropometry of the Head and Face, 2nd Ed., New York, Raven Press, 1994.
5. Maas CS, Merwin GE, Wilson J, Frey MD and Maves MD. Comparison of biomaterials for facial bone augmentation. Arch Otolaryngol. Head Neck Surg. 116:551, 1990.
6. Terino, EO. Alloplastic facial contouring: Surgery of the fourth plane. Aesthetic Plast Surg. 16: 195, 1992.
7. Terino, EO. Unique mandibular implants, including lateral and posterior angle implants. Facial Plast Surg. Clin. North Am. 2:311, 1994.
8. Whitaker LA. Aesthetic augmentation of the posterior mandible. Plast. Reconstr. Surg. 87:268, 1991.
9. Aiche AE. Mandibular angle implants. Aesthetic Plast Surg. 16:3490, 1992.
10. Taylor CO and Teenier TJ. Evaluation and augmentation of the mandibular angle region. Facial Plast Surg. Clin North Am. 3:329, 1994.
11. Ramirez OM. The mandibular matrix system. Plast. Reconstr. Surg.
12. Yaremchuk MJ. Mandibular augmentation. Plast. Reconstr. Surg. 106:697, 2000.
13. Zide BM. The mentalis muscle: An essential component of chin and lower lip position. Plast. Reconst. Surg. 83:413, 1989.
Leave Comments
You must be logged in to post a comment.